Tuesday, September 14, 2010
The Move is Complete!
I was finally able to successfully move my blog to its own site! If you've been reading, you know I had to change the name. You can now find me at http://happyhealthymama.com/. I hope you like the new name and look. Come on over! Remember to subscribe to get email updates when I post.
Monday, September 13, 2010
Listen to Your Body
On a recent trip to my parent's house, I was going through some of my old stuff. I found a journal from my senior year in high school. In this journal was a list of resolutions for the new year. Check out the list from my 17-year-old self:
1. Eat healthier foods--no pop
2. Practice b-ball MORE!
3. Exercise MORE!
4. Keep priorities straight ALWAYS
Interesting for a young girl, right? What really surprised me was my focus on healthy eating and living; I really don't remember thinking about it at that age. Clearly, though, I did. I guess even then I knew how important it was to eat right and take care of your body.
This got me pondering t the evolution of thinking I've had about how I define healthy. I was definitely on the right track at age 17 with the pop thing, but I'm sure my overall view of healthy eating involved counting fat grams with no thoughts about processed foods or putting toxins in my body. Remember the days when low fat=healthy? Gummy bears? They're low fat! They're good for you!
Over the years I have tried numerous diets. It's kind of ludicrous when I think about it. Sometimes my motivation was to lose weight, other times I guess it was mainly curiosity. Let's take a look at my diet days:
Body For Life: My first year out of college, my roommate and I did this one together. We couldn't resist those transformation pictures. That could be us! We'd get up early and do the weight-heavy workouts before going to work and tried to follow the 6-meals-a-day plan. I loved the Sunday free day--eat whatever you want! I'm not sure how long we hung with it, but I know we didn't make it through the whole program.
Calorie Restriction: The next year I moved to Arizona. My new roommate was ultra-fit and skinny and I always felt awful when I couldn't fit into her jeans. I watched how she ate and figured it worked for her, so I might as well mimic her habits. I'm ashamed to admit I started drinking Slim-Fast shakes for breakfast and sometimes also for lunch. Then, a sensible dinner. "Sensible" means a Lean Cuisine frozen dinner, right? For me it did. This plan just didn't work for me. Clearly I wasn't getting enough fresh foods, but also I couldn't handle calorie restriction. I'm just too hungry of a girl. So I'd often binge snack between my shakes. Not good.
The Atkins Diet: The following summer I spent too much time eating out and not enough time in the gym and this resulted in an 8 pound weight gain. I wanted to lose the weight quickly and knew several people who'd lost weight with the ever-popular Atkins Diet, so I gave it a try. I stocked up on meat, eggs, and cheese and hoped for the best. I lasted all of 2 days and I was done. I was seriously a lethargic thug. Not only do I like my carbs, it's clear my body needs them. I have no idea how anyone does this diet for any length of time. I ended up losing the weight the old-fashioned way: lots of extra trips to the gym.
The Zone Diet: This one came about a year and a half after the Atkins debacle. I had a serious boyfriend, soon to be fiance (now husband), and we did this together. I can't remember what spurred me to want to try it, but I don't think I was wanting to lose weight. I may have just been intrigued. Better than the Atkins try, I lasted 2 whole weeks on the Zone Diet. I had to buy my first kitchen scale in order to carry out this diet--that should have been my first clue that this one wasn't going to last long-term. I actually learned a lot from reading the book and started some good eating habits as a result of this diet, but trying to perfectly combine my foods was just too much for me. Plus, I felt there were too many restrictions. I mean, really, butternut squash and sweet potatoes on the unfavorable carbohydrate list? Those are too good to restrict!
Vegan: Shortly after my mom was diagnosed with cancer and I got serious about learning about nutrition, I tried to go vegan "cold turkey" (no pun intended). I was not ready for such a drastic change. I did start trying more vegan dishes, but I quickly downgraded to vegetarian (see below).
Vegetarian: Discouraged that the vegan diet was so difficult for me, I decided that I would go vegetarian and only eat cheese in moderation. I stopped drinking cow's milk, but did continue to use butter some. I didn't find this difficult. The hardest thing was getting my husband to be supportive when I wanted to stop cooking meat for dinners. He called all of my new dinners "great side dishes, but not a meal". My vegetarianism lasted about 4 months. Then, I got pregnant. With pregnancy came horrible all-day sickness (can't accurately call it morning sickness in my case) and my eating was limited to what my body would allow. Given that I couldn't tolerate important vegetarian protein sources, like beans, I started eating meat again. That was almost three years ago and I haven't gone back to totally vegetarian since then.
That brings us to where I am today. I have comfortably settled into a place where I have learned a few important lessons. #1: I don't want to be a dieter. Diets suck. #2: There isn't a diet out there that will work for everyone. Every body will respond differently to different eating patterns.
I need to listen to my body and figure out what works for me. This is what I have done and how I've gotten to the way I eat today. I would describe my current "diet" (aka-the way I eat) as primarily whole foods and plant-based. But I'm not a vegetarian or a vegan. Sometimes I eat meat, sometimes I eat other animal products, but mostly in moderation.
I believe my body knows what it needs. If I am craving meat, I'll eat it because it may mean I need some iron, or B12, or whatever other nutrients you get from meat. I have to be careful, though. Sometimes my body tells me it is craving a Cinn-a-bun original, in which case I have to tell my body to take a hike, literally.
Because I listen to my body, when I was craving some bacon the other day I was happy to buy this:

It had to be turkey bacon because I don't eat pigs. I watched a documentary about a pig farm a few years back and just can't do it, plus pigs eat their own poop. Seriously.
I know as far as meat goes, processed meat is about as bad as it gets. So I was excited when I found this product--uncured, minimally processed.
I used the bacon to make a BALT sandwich, Bacon, Avocado, Lettuce, & Tomato. With a spread of grapeseed oil vegan mayo on toasted whole grain bread, it was just what I needed. (Oh, the irony of using vegan mayo on a sandwich with bacon...)

The question is: now that I've gotten my bacon fix, what am I going to do with the rest of the package? Freeze it? Because I listen to my body I know I will not be eating bacon sandwiches 5 days in a row in order to finish up the unused portion.
Friday, September 10, 2010
How We Roll
Summer is winding down and our crazy travel days are behind us, at least for a little while. I thought I'd share some pictures of the food we bring with us when we travel. It's so easy to forget about healthy eating when we travel. It's easy to say, "Ah, I'm on vacation, it's okay to eat whatever for a few days". And you know what? I think flexibility is great and indulging in our favorite not-so-healthy foods once in a while is okay. But overall, I feel better when I eat what my body is used to--wholesome, quality foods. I really don't want to waste my splurges on convenience store snacks or fast food when I'm on the road, either, so for me, a little planning goes a long way when we are traveling. We always travel with our cooler and snack bag when we are doing car road trips. For air travel, we obviously can't bring a cooler, but we do bring healthy, dry snacks.
Here's a peek at what we brought on our last trip:

Here's a peek at what we brought on our last trip:

Veggie chips-for a processed food, they are not bad. All real ingredients, no artificial ingredients or preservatives, and no hydrogenated oils.
Just Peas and Just Corn-love these snacks.
Lara Bars-These bars are the best! Only 2-4 ingredients in each bar and so good. Meghan asks for them all the time. They are perfect for traveling.
Homemade Oatmeal Cookies-Gotta have our treats! :)
Roasted Pumpkin seeds-roasted with a little oil and salt.
For the cooler:

Organic plain yogurt and organic cheddar cheese-because getting organic food where we were going is not easy (nearly impossible).
Sugar snap peas and shelled edamame-mostly because I didn't want them to go bad while we were gone. They made great snacks and lunch accompaniments.
Organic fruit-perfect for snack and meals.
We also brought some peanut butter and jelly sandwiches for our lunch stop. Can't go wrong with a little PB&J.
So this is how we roll when traveling. Even though when we're on the road we probably eat our worst, planning ahead and bringing some good food helps us keep it a little healthier.
Wednesday, September 8, 2010
Light & Flavorful Dinner
I got a text message from Tim yesterday afternoon letting me know he was having a late lunch and asking me to plan for a light dinner. What I put together was definitely light, but big on flavor. It's amazing how roasting foods can bring out such complex and deep flavors. And I just love roasting foods because it's so easy and hands off. My easiest dinners involve roasting. A 30 minute meal, this dish is so simple, yet so good. I'm pretty sure it's going to become a go-to meal for me. If I don't forget about it, which I often do with new recipes I try. ;-)

Roasted Chickpeas, Cauliflower, and Tomatoes with Herbed Couscous
1 tablespoon extra-virgin olive oil
1 heaping tablespoon fresh oregano, chopped
2 cups cauliflower florets, cut into small pieces
1 (15 1/2 ounce) can chickpeas (garbanzo beans)
10 1/2 ounces super sweet yellow cherry tomatoes (if you can't find these, regular cherry tomatoes will work)
1/2 teaspoon kosher salt
2 tablespoons fresh lemon juice
1 cup couscous
1 1/2 cups water
1 tablespoon fresh oregano, chopped
1 1/2 tablespoons vegan margarine or butter, optional
1-2 tablespoons fresh lemon juice
3 tablespoons golden raisins, optional
Preheat the oven to 400 degrees. Lightly oil a baking sheet.
Put the cauliflower, tomatoes, and chickpeas in a medium bowl. Add oil, oregano, salt, and lemon juice. Toss to coat everything evenly. Place on the oiled baking sheet and spread out so nothing is overlapping. Roast in preheated oven for 20-25 minutes, until vegetables are starting to brown and tomatoes are starting to burst.

When there are approximately 10-15 minutes left in roasting time, start your couscous. Allow water to boil. Add couscous, oregano, lemon juice, and vegan margarine, if using. Stir, then cover and allow to simmer 2-3 minutes until water is absorbed. Fluff couscous with a fork and allow to sit for five minutes before serving. Add golden raisins just before serving.
The vegetable portion makes 3-4 servings, while the couscous makes 4. I had a little couscous leftover, but we ate up all the chickpeas and veggies. I cannot even tell you how delicious these little cherry tomatoes were. They burst in your mouth with tremendous flavor. If you see the "super sweet yellow cherry tomatoes" in your grocery store, I highly recommend you give them a try!
Tuesday, September 7, 2010
Toddler Tuesday: Why I Choose Organic (and I think you should, too!)
Before Meghan was born, I didn't buy much organic food. I figured I was doing well to be eating a good amount of fruits, vegetables, and whole grains, and didn't think buying organic was worth the extra cost. To be honest, I was blissfully ignorant at the time. I hadn't done my research and therefore didn't fully understand why buying food that was organically grown was so important.
Then Little Miss Meghan came along and I started reading about baby and toddler nutrition. What I've learned has completely changed my outlook. Not only is buying organically grown food totally worth the cost, not going organic could be detrimental to my little girl's health. That is not something I'm willing to live with.
Why Organic?
Foods that are organically grown are grown without the use of pesticides. Pesticides are chemicals that are used to repel insects and pests. They are sprayed directly onto most produce that is not labeled "organic". It's not like you can just rinse the vegetable and hope all the chemical will come off, the residue remains and then is ingested by whoever eats that vegetable. (The only time you can be happy your little one refuses to eat his veggies!) These pesticides are dangerous and can have many long-term health effects, many of which are just being discovered. If you choose organic, you can be confident that your child is not ingesting these dangerous chemicals. There are other reasons to choose organic, but avoiding pesticides is the most compelling reason for me.
The Health Effects of Pesticides
Pesticides have been linked to a variety of health issues. Children are particularly susceptible to pesticides because they have smaller bodies that can't handle the toxic load and they are still growing and developing. Exposure to pesticides has shown an increased risk for:
Baby Steps
It's no secret that organic foods are usually pricier than the non-organic variety. I didn't go totally organic all at once. In fact, there are still some foods that I buy that are not organic, and there are times when I can't totally control what Meghan eats. (Like when we travel to someone else's house, for example) I try my best to ensure the bulk of Meghan's diet is pesticide-free. I started with the list of the "Dirty Dozen" and decided those foods would be on my absolutely-must-buy-organic list. These are the top 12 foods that are found to be the most pesticide-laden. This is a well-circulated list, but if you haven't seen it yet, here it is:
The Dirty Dozen
Then Little Miss Meghan came along and I started reading about baby and toddler nutrition. What I've learned has completely changed my outlook. Not only is buying organically grown food totally worth the cost, not going organic could be detrimental to my little girl's health. That is not something I'm willing to live with.
Why Organic?
Foods that are organically grown are grown without the use of pesticides. Pesticides are chemicals that are used to repel insects and pests. They are sprayed directly onto most produce that is not labeled "organic". It's not like you can just rinse the vegetable and hope all the chemical will come off, the residue remains and then is ingested by whoever eats that vegetable. (The only time you can be happy your little one refuses to eat his veggies!) These pesticides are dangerous and can have many long-term health effects, many of which are just being discovered. If you choose organic, you can be confident that your child is not ingesting these dangerous chemicals. There are other reasons to choose organic, but avoiding pesticides is the most compelling reason for me.
The Health Effects of Pesticides
Pesticides have been linked to a variety of health issues. Children are particularly susceptible to pesticides because they have smaller bodies that can't handle the toxic load and they are still growing and developing. Exposure to pesticides has shown an increased risk for:
- asthma
- reduced IQ
- learning disabilities
- Attention Deficit Hyperactivity Disorder (ADHD)
- childhood cancers, including leukemia, neuroblastoma, Wilms tumor, soft-tissue sarcoma, Ewing's sarcoma, non-Hodgkin's lymphoma, and cancers of the brain, colorectum, and testes.
Baby Steps
It's no secret that organic foods are usually pricier than the non-organic variety. I didn't go totally organic all at once. In fact, there are still some foods that I buy that are not organic, and there are times when I can't totally control what Meghan eats. (Like when we travel to someone else's house, for example) I try my best to ensure the bulk of Meghan's diet is pesticide-free. I started with the list of the "Dirty Dozen" and decided those foods would be on my absolutely-must-buy-organic list. These are the top 12 foods that are found to be the most pesticide-laden. This is a well-circulated list, but if you haven't seen it yet, here it is:
The Dirty Dozen
- peaches
- apples
- bell peppers
- celery
- nectarines
- strawberries
- cherries
- kale
- lettuce
- grapes
- carrots
- pears
There is also a list showing the "Clean 15", or the foods that have the least amount of pesticides. These are the foods that if necessary, I'll buy non-organic.
The Clean 15
- onions
- avocadoes
- sweet corn
- pineapples
- mangoes
- asparagus
- sweet peas
- kiwi fruit
- cabbage
- eggplant
- papayas
- watermelon
- broccoli
- tomatoes
- sweet potatoes
I have both these lists on my refrigerator as a reminder. Any foods that aren't on the list, including whole grains, beans, and animal products, I try to buy organic as much as possible. Whether or not the food is organic, I always clean it well before eating.
What About Dairy and Meat?
I think it's just as important, if not more important, to buy organic dairy and meat. If the animal product is not labeled organic, that means the animal most likely ingested pesticide-laden foods and is passing that burden on to you. In addition, non-organically grown animals are often injected with hormones and steroids to promote rapid growth and again, those are passed on to the consumer. Oh, wait, there's one more thing to consider. Even if the animal products are labeled "Hormone and steroid-free", as some non-organic animal products are, those animals were still likely given an abundance of antibiotics during their life. This causes problems for humans. According to an article written by Marc Kauffman and published in the Washington Post, "Giving animals antibiotics in their feed can cause microbes in the livestock to become resistant to the drugs. People can then become infected with the resistant bacteria by eating or handling meat contaminated with the pathogens."
If you don't feed your family organic foods, I urge you to reconsider. Although the price of these foods is higher, you can't put a price on a healthy child. There are many ways to tweak your budget to make room for higher-priced, but higher-quality foods. Are you already an organic family? I'd love to hear your money-saving tips! Please leave a comment and share how you have been able to make room for organic foods on a small budget.
Thursday, September 2, 2010
Toddler Thursday: Healthy Cookies
Two toddler posts this week!

I made a mistake last Easter. I told someone that I wasn't planning on putting any candy in Meghan's Easter basket, but was going to fill it with little toys, bubbles, and stickers. She was only 18 months old, hadn't had any sugary treats yet, and I wanted to keep it that way. Then, somehow, the person made me feel like I was depriving her. It wasn't intentional, but just something in her voice and subtle words had me questioning myself. So at the last minute I decided to add a little something sweet in her basket. I ended up with these:

To say she liked them would be an understatement. The girl has definitely inherited her mom and dad's sweet tooth. Check out the ingredient list:
Nutrition Facts
Serving Size: About 9 Pieces
Servings per Container: About 7
| Amount Per Serving | % Daily Value | |
| Calories | 90 | * |
| Calories from Fat | 25 | * |
| Total Fat | 3 g | * |
| Saturated Fat | 0 g | * |
| Trans Fat | 0 g | * |
| Cholesterol | 0 mg | * |
| Sodium | 40 mg | * |
| Total Carb. | 15 g | * |
| Dietary Fiber < | 1 g | * |
| Sugars | 6 g | * |
| Protein | 1 g | 0% |
| Vitamin A | 0% | |
| Vitamin C | 0% | |
| Calcium | 0% | |
| Iron | 20% | |
| Thiamin | 20% | |
| Riboflavin | 20% | |
| Niacin | 20% | |
| Vitamin B6 | 25% | |
| Folic Acid | 20% | |
| Vitamin B12 | 20% | |
| Phosphorous | 20% | |
| Zinc | 20% | |
*Daily value not established.
Other Ingredients: Organic Wheat Flour, Organic Evaporated Cane Juice (Organic Evaporated Cane Juice, Organic Corn Starch), Organic Sunflower Oil, Organic Raisin Paste, Organic Oat Flour, Organic Evaporated Cane Juice Syrup, Organic Cinnamon, Baking Soda (Sodium Bicarbonate), Salt, Leavening (Amonium Bicarbonate), Vitamin and Mineral Blend (Thiamine Mononitrate [Vitamin B1], Riboflavin [Vitamin B2], Niacinamide [Vitamin B3], Pyridoxine Hydrochloride [Vitamin B6], Cyanocobalamin [Vitamin B12], Folic Acid, Zinc Oxide, and Reduced Iron].
Free Of
Hydrogenated oils, genetically engineered ingredients, artificial flavors, colors, preservatives and pesticides.
Not bad, right? Well, not great, either. I like that there are no hydrogenated oils, GMOs, artificial flavors, colors, preservatives, or pesticides. That's all good. What I don't like is that the #1 ingredient is wheat flour rather than whole wheat flour and the #2 ingredient is evaporated cane juice (aka sugar). These could be much worse, but I still wanted to try to make a healthy cookie alternative for Meghan since she is, essentially, a cookie monster since I introduced these at Easter.
Meghan had fun helping me come up with the right combination of ingredients:


She's turning into such a ham! :-) I asked her to "say cheese" and she put her hand under her chin like a super model!
The first batch didn't work out. I wanted to try to use up some garbanzo flour I had, but it just didn't taste right. Too bad, because those would have been some seriously high protein cookies! The second batch, however, was a big success. I had to use 1/2 whole wheat flour and 1/2 all-purpose flour to get a better texture, but with the whole wheat flour and oats, these can definitely be considered whole grain cookies. Meghan loves these, just as much as her beloved Earth's Best cookies it seems. Do they taste as great as old-fashioned cookies made with all white flour, butter, etc.? No. But these vegan, healthy cookies, made with only pure maple syrup as a sweetener, are cookies you can feel good about eating.
Spiced Maple Oatmeal Cookies
2 cups rolled oats
1/2 cup whole wheat flour
1/2 cup all-purpose flour
1/2 teaspoon baking soda
1/2 teaspoon baking powder
1/4 teaspoon salt
1 teaspoon cinnamon
1/2 teaspoon all spice
1 teaspoon vanilla
1 cup unsweetened apple sauce
1/2 cup pure maple syrup
1/2 cup natural peanut butter
Preheat your oven to 350 degrees. Line two baking sheets with parchment paper (for easy clean up!).
In a large bowl, mix all of your dry ingredients. (Rolled oats through all spice) In a separate bowl, mix together the wet ingredients (vanilla through peanut butter). Pour your wet ingredients on top of the dry ingredients and mix until they are well-incorporated and you don't see any dry spots.
Using a tablespoon, drop the cookies onto the cookie sheets. Using the back of the spoon, press the cookies down to flatten them.
Bake in the preheated oven for 18 minutes, turning the pans 180 degrees once in the middle of the cooking time.
Makes 28 cookies
All right folks, we are hitting the road again for a long weekend at the lake. I'll be back on Tuesday. Have a great weekend!
Wednesday, September 1, 2010
Revisiting an Old Standby: Quick Stir Fry
The December before I graduated college I was given my first cookbook as a Christmas gift. It was like a big hint: you're on your own now, baby, you better learn how to fend for yourself in the kitchen.

I remember feeling all domestic as I leafed through the pages, trying to find the recipes that didn't intimidate me. One of the first ones I tried was this, my favorite dinner throughout high school and college:

Can you read that? Yes, it is good old Fettuccine Alfredo. This quickly became a standby dish for me, something I had in my regular rotation of the few dinners I knew how to make. It's difficult to remember a me who would eat this dish without thinking twice about what it was made with. I don't recall what it was like to eat and not think about what I was putting in my body--but I actually lived most of my life blissfully unaware of the impact our diet can have on our health and well-being.
As I got older and started learning more about nutrition, I had to change the way I cooked. This has been a journey and I am continually evolving, but I do remember where I started. When I first began trying to cook more healthfully, I made a lot, I mean a lot of stir-fry vegetable dishes. My cooking repertoire didn't have much depth to begin with, but to limit it to what could be defined as healthy cut it down even more. So I stuck with safe, easy stir-fry dishes. So much so that one day my hubby exclaimed, "I don't care what you make, but please no more mixed vegetables with rice!" To make matter worse, in those days I was working full time and often used frozen vegetables for my stir fries. Bleh.
So it's been a really long time since I've made a classic, Asian-style stir fry dish. I was pleasantly surprised with the results and realized that I need to throw these kind of dinners back into the mix more often. This is a quick and easy dish that makes a perfect weeknight meal.

2 cups vegetable broth/stock
2 tsp butter or vegan margarine (optional)
2 carrots, thinly sliced
1 tablespoon coconut oil
10 ounces sliced mushrooms
1/2 lb. sugar snap peas
1 cup edamame (thawed if using frozen)
sea salt
for the sauce
1/2 cup vegetable broth/stock
1/4 cup coconut milk (lite is fine)
1/4 cup natural peanut butter
1 teaspoon curry powder
1/2 teaspoon sea salt
Put your rice in a pot with the vegetable broth or stock and butter. Bring the rice to a boil, then reduce the heat to low, cover, and allow the rice to simmer until it is soft and the liquid is absorbed. (About 50 minutes for regular brown rice. If you use par-boiled, the cooking time is cut down to about 30 minutes.)
When your rice has about 20-25 minutes cooking time left:
Steam your carrots until they are crisp-tender. Meanwhile:
In a large skillet, melt the coconut oil over medium high heat. Add the mushrooms and saute until they are soft and reduced in size, about 8 minutes. Once the carrots are crisp-tender, add them to the skillet and stir fry for about 5 minutes. Add the snap peas and edamame along with a few sprinkles of salt and stir fry until everything is warm, about another 5 minutes.


To make your sauce, place all ingredients in a small sauce pan over medium low heat and stir. When sauce is heated, it's ready. Taste and season accordingly.
When the rice is finished cooking, fluff with a fork. Serve with a portion of rice, topped with the vegetables and a drizzle of the sauce.
Meghan's plate looked like this:

Rice, carrots, edamame, and the sauce separate instead of together. (Is this a toddler thing or just a Meghan thing? She doesn't ever want her food all mixed together.) I also gave her some leftover zucchini coins. Next time I'll make sure we eat them all up on the first night because these were not great as leftovers. Her favorite thing was the sauce. She ate it with a spoon as if it was soup. I had to convince her to dip her carrots, edamame, and rice into it.
If you already have some cooked brown rice, this meal will come together even quicker. This is one old standby I'm glad I revisited. I'm pretty sure Fettuccine Alfredo will never be an old standby again.
Tuesday, August 31, 2010
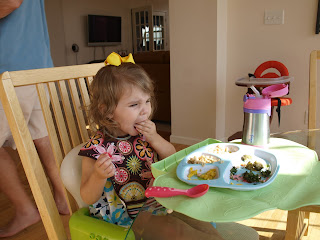
Toddler Tuesday: Baked Parmesan Zucchini Coins
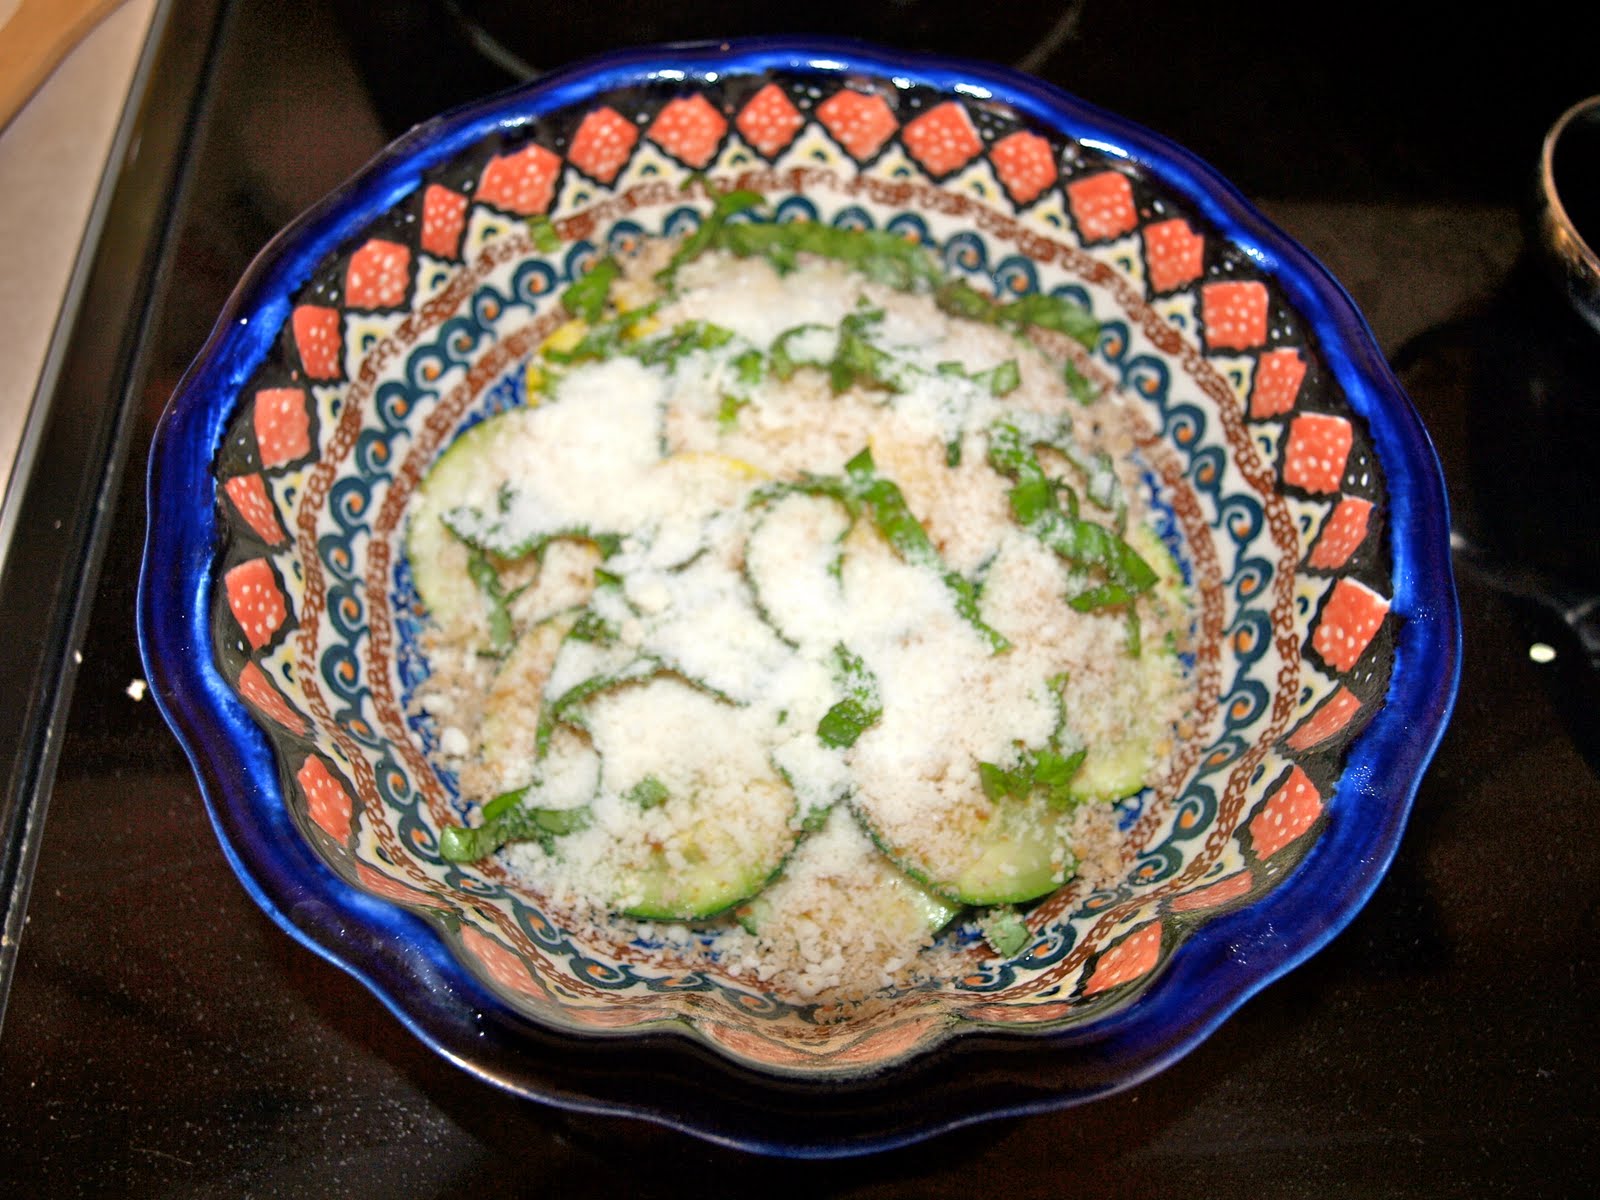
Meghan likes most of her vegetables served plain, just lightly steamed. She will eat just about all the vegetables I have offered her, but there are a few she refuses again and again. One of her seemingly least-favorite vegetables is zucchini. I've put some on her plate time and again as it's a vegetable I use often, but she never gets it from her fingers to her mouth. I think it's the slimy look of zucchini (and no, I don't overcook it!). I decided to try it a different way and see if she would give it a go. It worked! I just changed the look of it by baking it with some cheese/bread coating and she didn't even look twice at it--picked it right up and ate it. And the real key: after her first bite she took another. Next time I may add some spices (probably Italian spices) to liven it up a bit for Tim and me, but these are still good without them.
Baked Parmesan Zucchini Coins
1 medium zucchini, sliced thinly
1 egg, beaten
1/2 cup whole grain bread crumbs
1/2 cup grated parmesan cheese
1/4 cup flour (I used whole wheat)
Serves two adults and one child.
Preheat your oven to 350 degrees and lightly oil a baking sheet.
 Get three small bowls and set up your station: In one bowl, beat your egg. In another bowl, add the flour. In the third bowl, mix the bread crumbs and cheese.
First, dip a coin in the egg and turn it to coat it on all sides. Then, coat it with flour. Follow this by another dip in the egg bowl, and finish with a coating of the bread/cheese mixture. Place on the tray and continue until you have all your coins coated. It's helpful to have a paper towel nearby as your hands will get sticky.
 Bake for 20 minutes and allow to cool before serving.

Baked Parmesan Zucchini Coins
1 medium zucchini, sliced thinly
1 egg, beaten
1/2 cup whole grain bread crumbs
1/2 cup grated parmesan cheese
1/4 cup flour (I used whole wheat)
Serves two adults and one child.
Preheat your oven to 350 degrees and lightly oil a baking sheet.

First, dip a coin in the egg and turn it to coat it on all sides. Then, coat it with flour. Follow this by another dip in the egg bowl, and finish with a coating of the bread/cheese mixture. Place on the tray and continue until you have all your coins coated. It's helpful to have a paper towel nearby as your hands will get sticky.


The cheese and bread made a nice, crisp coating, but not too crisp that it was difficult for Meghan to eat. These were really good plain, but think they would be great with a tomato dipping sauce. For Meghan, I cut the coin into quarters so they would be in bite-sized pieces for her. The adults ate them whole.
If you make these with some added spices, let me know how they turn out! I'm happy to have another vegetable option for Meghan in my repertoire.
Monday, August 30, 2010
If You Think You Don't Like Tofu, Try This
There was a time when the thought of preparing tofu at home intimidated me. I would use it as a stand-in for cheese in casserole dishes or lasagna, but that was about it. I've enjoyed some tofu dishes at restaurants, but have always shied away from making a meal with tofu as the main ingredient. Then I tried Sweet Chili Lime Tofu from Vegan Yum Yum. This has become a staple meal at our house--Tim actually gets excited when he knows I'm going to make it. And it's easy. So incredibly easy. Totally takes the intimidation factor out of cooking with tofu. The last time I made this, I made a modified version for Meghan, as the regular dish is rather spicy and I wasn't sure if it'd be too hot for her. I have changed the original recipe just a bit to make it a little healthier.
Sweet Chili Lime Tofu
Adapted from Vegan Yum Yum
3/4 cup quinoa
zest from one lime, divided
1 cinnamon stick
1/4 teaspoon salt
1 1/3 cups water
1 14-ounce block of extra-firm tofu
1 bunch kale, washed, deveined, and cut into bite-sized pieces
2-3 tablespoons water
1 teaspoon lime juice
1 pinch salt
for the sauce
3 tablespoons agave nectar (or sugar)
3 tablespoons reduced-sodium tamari (or soy sauce)
1 3/4 tablespoons fresh lime juice
1/2 zest of the lime
1/2 teaspoon red chili flakes
1 clove garlic, minced
1/4 teaspoon salt
4 mint leaves, chiffonade (stack the leaves, roll them up, and slice thinly)
Combine the quinoa, lime zest, cinnamon, salt and water in a pot with a tight-fitting lid. Bring to a boil. Once boiling, reduce the heat to low, cover, and allow to cook for 20 minutes. After 20 minutes, turn off the heat, but don't open the lid. Allow to steam for 10 minutes before serving.

Prepare the sweet chili lime sauce by whisking together all the sauce ingredients. I divided the ingredients and made a smaller, separate bowl of all the ingredients except the red chili flakes for Meghan.

Drain the tofu and cut it into small triangles. Thin, small slices work best for the dry frying method you will be using. In order to dry fry the tofu, you need a pan that the tofu won't stick to without using any oil. You can use either a well-seasoned cast-iron skillet or a non-stick skillet. I don't have a big enough non-stick skillet, so I had to do mine in batches. I also used a separate pan for Meghan's.
 |

Heat your pan over medium heat. Spread the tofu out in one layer. Use a spatula to press the tofu carefully. As you gently squeeze the liquid from the tofu, it will start to turn golden brown. Be gentle as to not break the tofu pieces and try to squeeze as much liquid out as possible, as this will make for firmer pieces.

After several minutes, gently flip the tofu over and continue frying on the other side. After about 10 minutes of frying time, Add the chili lime sauce and stir to coat the tofu. Turn off the heat and allow the sauce to bubble up, reduce, and form a glaze. (If this doesn't happen, turn your heat back up, your pan isn't hot enough)
Meanwhile, put your kale in a wok or large skillet with the water, lime juice, and salt. Cover and cook them over high heat 3-4 minutes until the greens are steamed and tender.

To serve, place the kale on your plate, top with quinoa and tofu. Drizzle any leftover sauce over the top of everything.
Meghan's plate looked a little different, as she likes her food separate.

Her meal also included raw red bell peppers and some cheese. I didn't give her any of the cooked kale. I'm pretty sure it would be way too slimy for her--she's a big texture girl. Anything that is too mushy or slimy and she won't even pick it up without making a face.
I was hoping to be ready to transfer to my new site by now, but life has been so hectic that I'm just not there yet. After this weekend (when we are traveling again), things should settle down and I hope to be able to focus on my blogging more. I'll keep you updated as to when the move it going to happen.
On another note, I read a really interesting article today about genetically modified organisms (GMOs) that I'd like to share. It's scary how much these types of foods can show up in what we eat without us even knowing it! Check it out here. Make sure to scroll to the bottom of the article and get the Non-GMO shopping guide. I printed it out; it's a great resource.
Tuesday, August 24, 2010
I'm Still Here
Hi there blog friends! I'm just checking in to give reassurance that I have not disappeared on you. This has been a busy, travel-filled summer (which I love!) and I'm not quite a mobile-blogger yet. After a wonderful weekend in San Diego, I am now in Phoenix visiting one of my besties and her brand new baby boy. I definitely chose the right time for my first trip back to Phoenix after moving last summer. Yesterday was 115 degrees and did not make me miss the desert at all. I will be back "home" in Ohio (ummm...is Ohio really my home? Yikes. Sorry Buckeye fans, I still can't believe I live in Ohio) tonight and hopefully posting some healthy-food thoughts within another day or so. Thanks for hanging with me during my temporary blogging lapses.
Tuesday, August 17, 2010
Toddler Tuesday: Don't Give Up...
...on foods you don't think your toddler likes. It's been a gratifying week. Toddlers have weird taste buds and weird moods to go along with those strange taste buds, but you never know what they will fancy one day to the next. So even if you think your little one definitely will not like, or has even refused more than once, a certain food, don't give up--keep offering. Meghan ate devoured two different foods this week that I didn't think she'd ever really love.
My general rule with any meal is that I always offer something I know Meghan will like--for her it's cheese or fruit--so that I know she's not going to go hungry because she doesn't like what I'm offering. There will be something for her to eat that she almost always enjoys. The rest of her meal may consist of something she occasionally likes and occasionally refuses, and then something she has always refused, or something new. I don't give up on offering the foods she has previously refused.


Another strategy I have is to offer the same food in a different way. Sometimes something as little as cutting a food differently will make a big difference. For example, sometimes I'll cut a sandwich into little fingers, like this:

Other times I cut them into little squares like this:
 |
| Pictured is one of Meghan's favorite sandwich combos: mashed avocado+nutritional yeast. Yum! |
This week I was reminded that these are two good strategies when Meghan happily ate a whole bowl of oatmeal and asked for seconds. Even though Meghan rarely eats oatmeal, I have continued to offer it to her on occasion. She will usually only eat a few bites. Continuing to offer it to her (it's familiar)+a new cooking method=a new food Meghan loves!
I switched it up a little when I discovered an interesting oatmeal recipe on the blog Kath Eats Real Food. I eat oatmeal for breakfast almost everyday. I usually just microwave old fashioned oats, add some fruit and cinnamon, and call it a day. (No wonder Meghan didn't like it!) This recipe calls for whipping sliced bananas in the oatmeal you cook on the stove. The result is a wonderfully light, creamy texture. Love it. So does Meghan. I basically followed Kath's recipe, but just added some cinnamon in at the end. (Did you know cinnamon helps regulate your blood sugar? Gotta have cinnamon in my oats!) Here's what I did:
Whipped Banana Oatmeal
Adapted from KathEats.com
1/3 cup soy milk
1/2 banana, thinly sliced
1 tablespoon chia seeds
1/2 tsp vanilla
1 teaspoon cinnamon
Combine the oats, milk, chia seeds, and very thinly sliced banana in a sauce pan over medium heat. Let it sit for a bit until it starts to steam or bubble, then vigorously stir to whip the bananas into the oats. Keep stirring until it reached the desired consistency. When it is the consistency you like, stir in the vanilla and cinnamon and serve. You can top with whatever you like or eat it alone. The whole process takes less than five minutes from start to finish! Here's my little one enjoying her whipped oatmeal:

Notice the bowl of strawberries? I always offer something I know she'll like!
The second surprise this week came when we were eating dinner. I made a side of kale chips for Tim and me, but didn't put any on Meghan's plate. I just assumed she wouldn't touch the kale and having it on her plate might even make her mad. Once I started eating mine, however, she looked over at me and said, "Chips! Chips!" She heard the crunch and assumed it was a chip. You know, a real chip. (Meghan loves crunchy things; whenever we have tortilla chips she insists on eating them, too.) Then she said, "Meghan chip! Meghan chip!" I shrugged my shoulders and handed over a kale chip, thinking she would probably spit it out. Not sure why I assumed this; kale chips are delicious and she doesn't have any set notions about green things being bad. Once she had one, she couldn't stop. She wanted more, more, more. She ate all I had on my plate and then still wanted more. Huh. Who would have thought?


That got me thinking. Why did I just assume she wouldn't like kale? Because I wouldn't have touched it before the age of 25? Maybe I would have liked it, too, if someone would have offered it to me at a young age. So I decided to go ahead and take the kale plunge. I added it to her beloved smoothie repertoire. I mixed it in with her favorite combo of banana+peanut butter. I have tried it twice so far. The first time, she drank the entire smoothie and asked for more. The second time, I got really ambitious. I added more kale. I filled up the entire Magic Bullet cup.

Meghan helped mix it up.


With double the amount of kale, Meghan still liked it. She drank almost her whole smoothie, but I could tell it wasn't her favorite. She didn't ask for more. I'll probably stick with the smaller amount of kale in the future. Here's the original recipe (approximations, I didn't measure):
Kale Smoothie
1/4 cup milk
1/4 cup plain yogurt
one large handful kale (deveined and torn into small pieces) Filled up about 1/2 the Magic Bullet cup
1-2 tablespoons peanut butter
1 banana
1 tablespoon ground flaxseed meal (optional)
4 ice cubes
Mix kale and milk in blender until the kale is broken down and you have a green mixture.

Add the rest of the ingredients and mix until smooth. Enjoy!

Sunday, August 15, 2010
Change is in the Air
Howdy blog readers! This post isn't going to have any healthy eating tips, ingredient information, or recipes. I just wanted to share some exciting news--my food blog is going to be moving. I've decided to leave blogger and use a self-hosted site. I had to change the name because ourdailybread.com was not an available url. I don't want to tell you the new name just yet because the new site is actually already live, but is definitely not ready to be seen yet. :-) My non-tech-savvy self is learning as I go, but I'm hoping the new site will be up and ready to go by next week. I'm trying to figure out how to export everything I've got on this blog to the new site; cross your fingers that none of my content is lost in the process! I will keep you updated on my progress and hope that you'll follow me to my new site and continue reading. There will still be a few posts here before the move, so keep checking back for new recipes.
Friday, August 13, 2010
Zucchini 3 Ways
Zucchini is in abundance at the farmer's market right now, and if you are lucky enough to have your own garden, you may be overflowing with summer squash right now. Looking for some different ways to use up your abundance? Read on for three different recipes where zucchini is the star. That's right, folks--one post with three recipes! Each recipe is tasty and showcases zucchini's versatility, so even if you don't have your own garden, it's worth buying some extra to give the recipes a try.
Zucchini and Gruyere Grilled Quesadillas
2 zucchini squash, sliced
1-2 tablespoons olive oil+more for brushing tortillas
sea salt
freshly ground black pepper
8 whole grain tortillas*
dijon mustard
1/2-1 cup shredded gruyere cheese**
*I used these whole grain tortillas from Trader Joe's

**TJ's has great prices on blocks of gruyere cheese. Much cheaper than I've seen anywhere else!
Slice your zucchini into medium sized coins.


Zucchini Gratin
2 zucchini squash
1 yellow squash
1 tablespoon coconut oil
1/2 cup freshly grated parmesan cheese
1/2 cup whole wheat bread crumbs
1/2 cup coarsely chopped fresh basil leaves
Preheat the oven to 350 degrees.
Slice your squash into 1/4-inch thick coins. Place on a baking sheet or wire racks and lightly salt. Allow to sit for 30 minutes. Don't skip this step. This will prevent your gratin from being soggy.

Thoroughly rinse and dry the squash. Heat the oil in a large skillet and saute the zucchini until it starts to brown, 8-10 minutes. In a small casserole bowl (sprayed with oil), cover the bottom with a layer of squash. (It's okay if the squash overlaps some.)


Summer Vegetable and Quinoa Skillet
1 1/2 cups quinoa
2 3/4 cups vegetable stock
olive oil
1 zucchini squash, sliced and then quartered
1 yellow squash, sliced and then quartered
1 cup cooked corn (fresh or frozen)
2 tablespoons fresh minced parsley
1/8 cup coarsely chopped fresh basil
juice of one small lemon
1/2 cup sliced almonds, toasted
sea salt, to taste
freshly ground black pepper, to taste
lemon zest
Heat a few swirls of olive oil in a large skillet. Add your squash to the skillet and saute until it starts to get tender, about 5 minutes.

Sure, zucchini is available all year round. But why not take advantage of the time when it is its freshest and most abundant?
Zucchini and Gruyere Grilled Quesadillas
2 zucchini squash, sliced
1-2 tablespoons olive oil+more for brushing tortillas
sea salt
freshly ground black pepper
8 whole grain tortillas*
dijon mustard
1/2-1 cup shredded gruyere cheese**
*I used these whole grain tortillas from Trader Joe's

**TJ's has great prices on blocks of gruyere cheese. Much cheaper than I've seen anywhere else!
Slice your zucchini into medium sized coins.

Heat the olive oil in a large skillet over medium heat. Add the zucchini and sprinkle with sea salt and freshly ground black pepper. Stir the zucchini around to coat it with the oil, salt, and pepper.

Saute the zucchini until it is tender and starting to brown, 8-10 minutes. Remove from heat.

Brush one side of a tortilla with olive oil and place it on a plate. Add about a teaspoon or so of dijon mustard to the other side and spread it around.

Cover the tortilla with a layer of zucchini coins, then a layer of the gruyere cheese. Put another tortilla on the top and brush the top with olive oil. Continue the process with the rest of the tortillas, stacking them on top of each other on the plate.

Carefully transfer each quesadilla to the grill (medium heat). Grill for 3-4 minutes, until the tortillas starts to brown, and then use a large spatula to carefully flip each quesadilla. Grill for an additional 3-4 minutes. Cut each quesadilla into 4 wedges and serve. Serves 4.
Serving size: 4 wedges.
These were very tasty and the leftovers were actually great for lunch the next day.
Zucchini Gratin
2 zucchini squash
1 yellow squash
1 tablespoon coconut oil
1/2 cup freshly grated parmesan cheese
1/2 cup whole wheat bread crumbs
1/2 cup coarsely chopped fresh basil leaves
Preheat the oven to 350 degrees.
Slice your squash into 1/4-inch thick coins. Place on a baking sheet or wire racks and lightly salt. Allow to sit for 30 minutes. Don't skip this step. This will prevent your gratin from being soggy.

Thoroughly rinse and dry the squash. Heat the oil in a large skillet and saute the zucchini until it starts to brown, 8-10 minutes. In a small casserole bowl (sprayed with oil), cover the bottom with a layer of squash. (It's okay if the squash overlaps some.)

Top with a layer of breadcrumbs, cheese, and basil.
Continue layering the squash, breadcrumbs, cheese and basil. Top with a little extra cheese. Cover with oil and bake for 10 minutes. Remove the foil and bake an additional 20 minutes until the top is brown and bubbly. Makes 4 simply delicious servings.


Yum! We accidently ate all 4 servings. (In case you don't know--there are only 2 1/2 of us. 1 woman+1 man+1 toddler)
1 1/2 cups quinoa
2 3/4 cups vegetable stock
olive oil
1 zucchini squash, sliced and then quartered
1 yellow squash, sliced and then quartered
1 cup cooked corn (fresh or frozen)
2 tablespoons fresh minced parsley
1/8 cup coarsely chopped fresh basil
juice of one small lemon
1/2 cup sliced almonds, toasted
sea salt, to taste
freshly ground black pepper, to taste
lemon zest
Heat a few swirls of olive oil in a large skillet. Add your squash to the skillet and saute until it starts to get tender, about 5 minutes.

Add the quinoa and stir. Add the vegetable stock and bring to a boil. Once boiling, lower the heat to medium low and cover. Allow to simmer until the liquid is absorbed, about 20 minutes.
~This is a good time to cook your corn if it isn't already (I used the microwave because I only had frozen corn available), toast your almonds (just use a small pan and dry toast them over medium heat), and prepare your parsley and basil. ~
Once the quinoa is ready, remove the cover and stir in the lemon juice, parsley, basil, and almonds. Taste and add salt and pepper to your liking. Top each serving with a some lemon zest. I'm not sure how many servings this makes--we ate about 1/2 of it and the left overs are still in the fridge. Tim really liked this dish and made sure to tell me he wanted me to make it again. I have a tendency to make something he likes and then forget about it and never make it again. What can I say? I like trying new things. :-)
 |
| I served this dish with roasted cauliflower. Who knew cauliflower could be so good? |
Subscribe to:
Posts (Atom)